
블로그를 쓰면서 가끔 썸네일 이미지를 생성형 AI를 이용해서 만들어서 사용했다.
주로 DALL-E 2를 이용했는데 원하는 퀄리티의 그림이 잘 안나와서 '무료버전이라 그런가' 생각했다.
그래서 배포된 서비스를 이용하지 말고 직접 모델을 돌리면 나아질까? 싶어서 직접 해보기로 했다.
설치 후 이용해 본 결과 원하는 퀄리티 이미지가 나오지 않는 것은 무료버전이 문제가 아니라 프롬프트의 문제였다.
이것이 프롬프트 엔지니어링의 중요성??!!
Stable Diffusion을 WebUI로 제공하는 오픈소스가 있어서 이용했다.
Mac을 이용하고 있으니 Apple Silicon에 설치하는 위키에 들어가서 하나씩 환경을 구축했다.
Installation on Apple Silicon
Stable Diffusion web UI. Contribute to openvinotoolkit/stable-diffusion-webui development by creating an account on GitHub.
github.com
1. brew 설치하기
homebrew : mac환경에서 사용하는 패키지 관리자. 우분투에서 apt 같은 것.
이미 설치되어있으니 패스.
mac을 사용하는데 brew가 없는 개발자라면 정신건강을 위해서 brew를 설치하자...
2. 의존성 설치
필요한 패키지들을 설치해야한다.
brew install cmake protobuf rust python@3.10 git wget모든 것이 설치되어 있으므로 패스.
다만 마음에 안들었던 것은 위의 명령어를 실행하면 전역에 설치된다는 것이다.
가상환경....
3. git clone
git clone https://github.com/AUTOMATIC1111/stable-diffusion-webui
4. 모델 다운로드
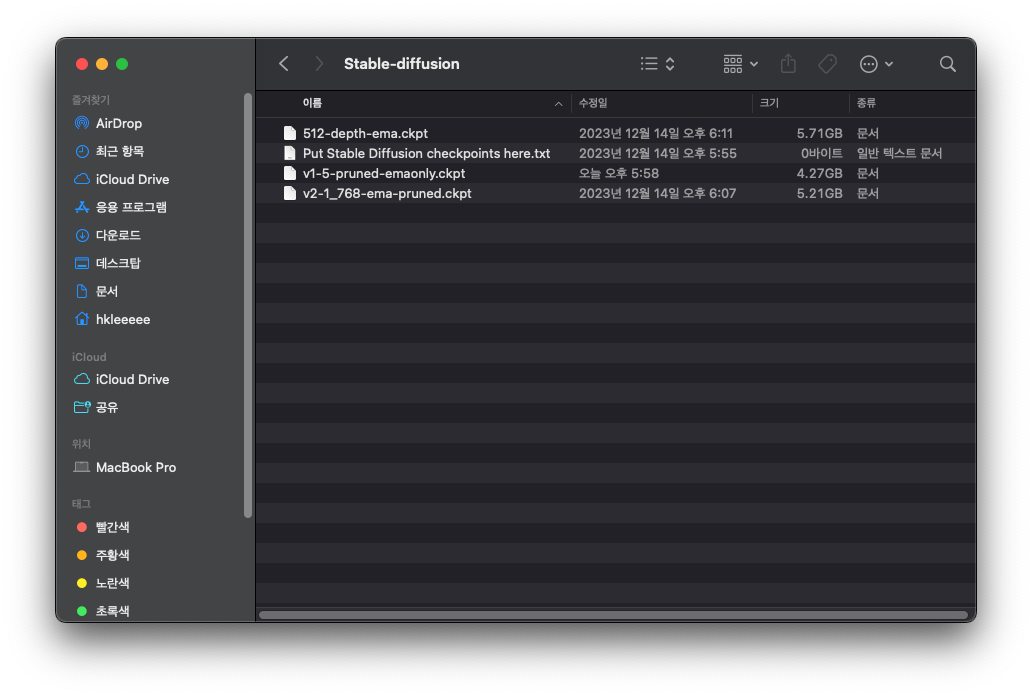
레포지토리 클론을 완료하고 디렉토리에 들어가면 models 폴더가 있다.
해당 폴더에 사용하고자 하는 모델의 체크포인트를 넣어주어야한다.
정확히는 Stable Diffusion에 사용할 모델의 체크포인트를 /models/Stable-diffusion 에 위치시켜주어야한다.
모델 체크포인트란
학습한 인공지능 모델로 이해할 수 있다.
학습 과정에서 최상의 결과를 보이는 가중치 값을 저장한다.
여기서는 사용하는 파일 확장자가 ckpt 인데 모든 인공지능 모델이 이 확장자를 사용하는 것은 아니다.
저장 형식, 프레임워크에 따라서 다양한 확장자가 있다!
위키에 보면 여러가지 버전의 모델을 소개하고 있고, 클릭하면 모델을 다운받을 수 있다.
스테이블 디퓨전의 구조나 개발 버전을 잘 알지 못해서 어떤 모델을 다운받을지 고민했다.
결국 여러가지 다운받았고 버전별로 차이는 느끼지 못했다.
하지만 버전별로 설정의 차이점이 존재하는 듯 했다.
모델들의 크기가 크니 단순 이미지 생성이 목적이라면 여러 개 받을 필요는 없다고 생각했다.
경량화가 되었겠구나라고 추측되는 pruned 붙은 모델들도 크게 파일 크기에서 차이가 없었다.
5. 실행하기
stable-diffusion-webui 디렉토리로 이동해 아래 명령어로 프로그램을 실행한다.
./webui.sh
실행이 성공하면 브라우저에 7860 포트로 Stable Diffusion이 열리게 된다.

이미지 생성해보기
웹 UI 좌측상단에서 체크포인트를 선택할 수 있다.
또 아래에서 생성옵션들을 선택할 수 있는데 Upscaler, Refinder, 결과이미지 사이즈 등 다양한 옵션들이 있었지만 기본으로 두고 진행했다.
- Upscaler
이미지를 생성하고 더 큰 사이즈의 이미지로 만들때 사용 - Refinder
이미지 생성 후 디테일한 부분을 더 잘 그리도록 보완
Stable Diffusion 1.2.0 depth model, 512-depth-ema.ckpt
이 모델은 초기 설정으로 이미지 생성을 시도하면 다음과 같은 shape이 안맞는다는 오류가 발생한다.
RuntimeError: Given groups=1, weight of size [320, 5, 3, 3],
expected input[1, 9, 64, 64] to have 5 channels, but got 9 channels insteadhttps://github.com/AUTOMATIC1111/stable-diffusion-webui/issues/5372
https://github.com/Mikubill/sd-webui-controlnet/issues/112
관련 이슈들이 존재했고
ControllNet을 껐다, 버전 V2와 V1의 작동방식이 달라 768만 지원한다, config file 수정이 필요하다는 등 방법을 찾을 수 있었다.
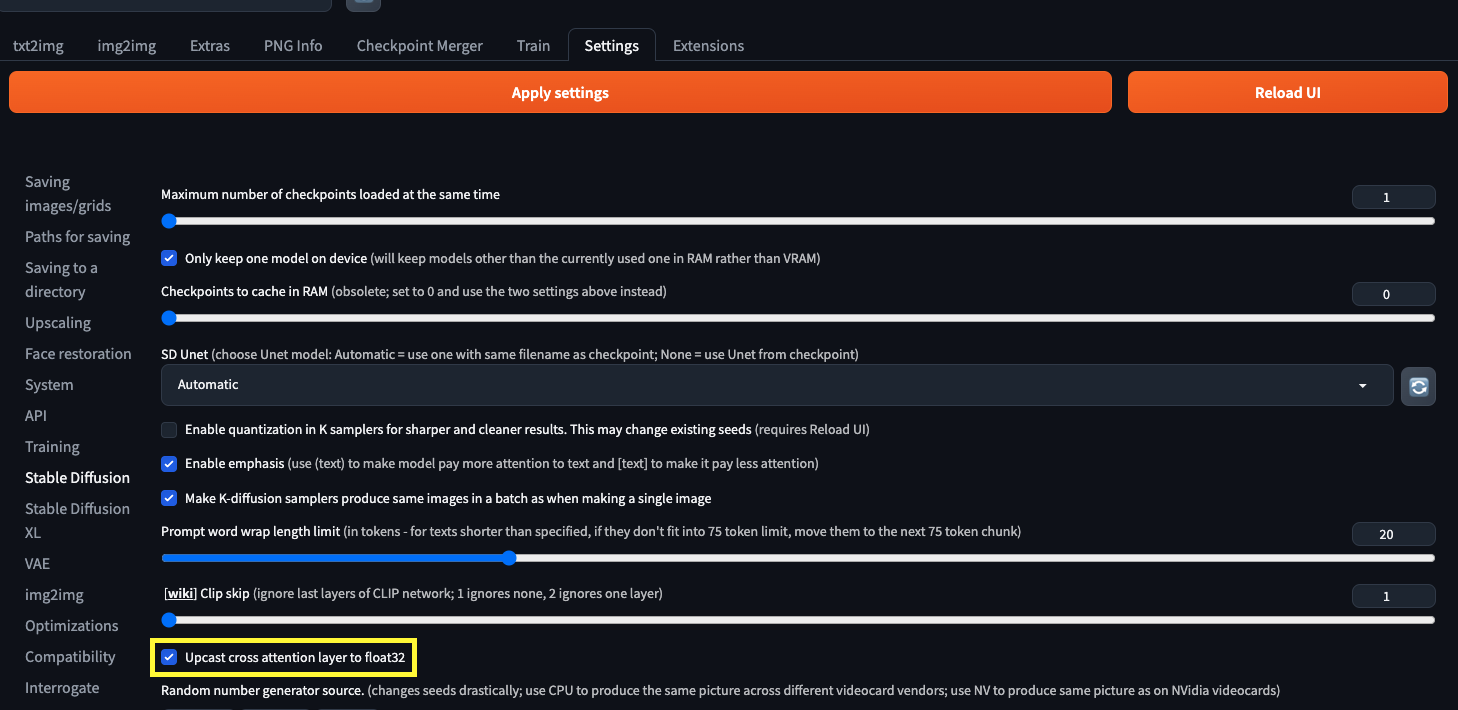
Stable Diffusion 2.1, v2-1_768-ema-pruned.ckpt
해당 모델, 기본 세팅으로 생성을 시도하니 다음과 같은 오류가 발생했다.
NansException: A tensor with all NaNs was produced in Unet.
This could be either because there's not enough precision to represent the picture,
or because your video card does not support half type.
Try setting the "Upcast cross attention layer to float32" option in
Settings > Stable Diffusion or using the --no-half commandline argument to fix this.
Use --disable-nan-check commandline argument to disable this check.Unet을 만나다니 반갑다
Setting에 들어가서 Upcast cross attention layer to float32 를 켜주어서 해결할 수 있다.
half type을 지원하지 않는 문제는 아닌 것 같고 어디선가 precision이 일치하지 않는 문제때문인 것 같다.
모델 버전관련 허깅 페이스문서를 읽어봤는데, precision관련 언급은 찾을 수 없었다.
Quantization이 따로 없었다면 default는 fp32일텐데 어디서 발생하는 문제인지는 아직 모르겠다.
위 옵션을 켜주고 나니 이미지 생성이 가능했다.
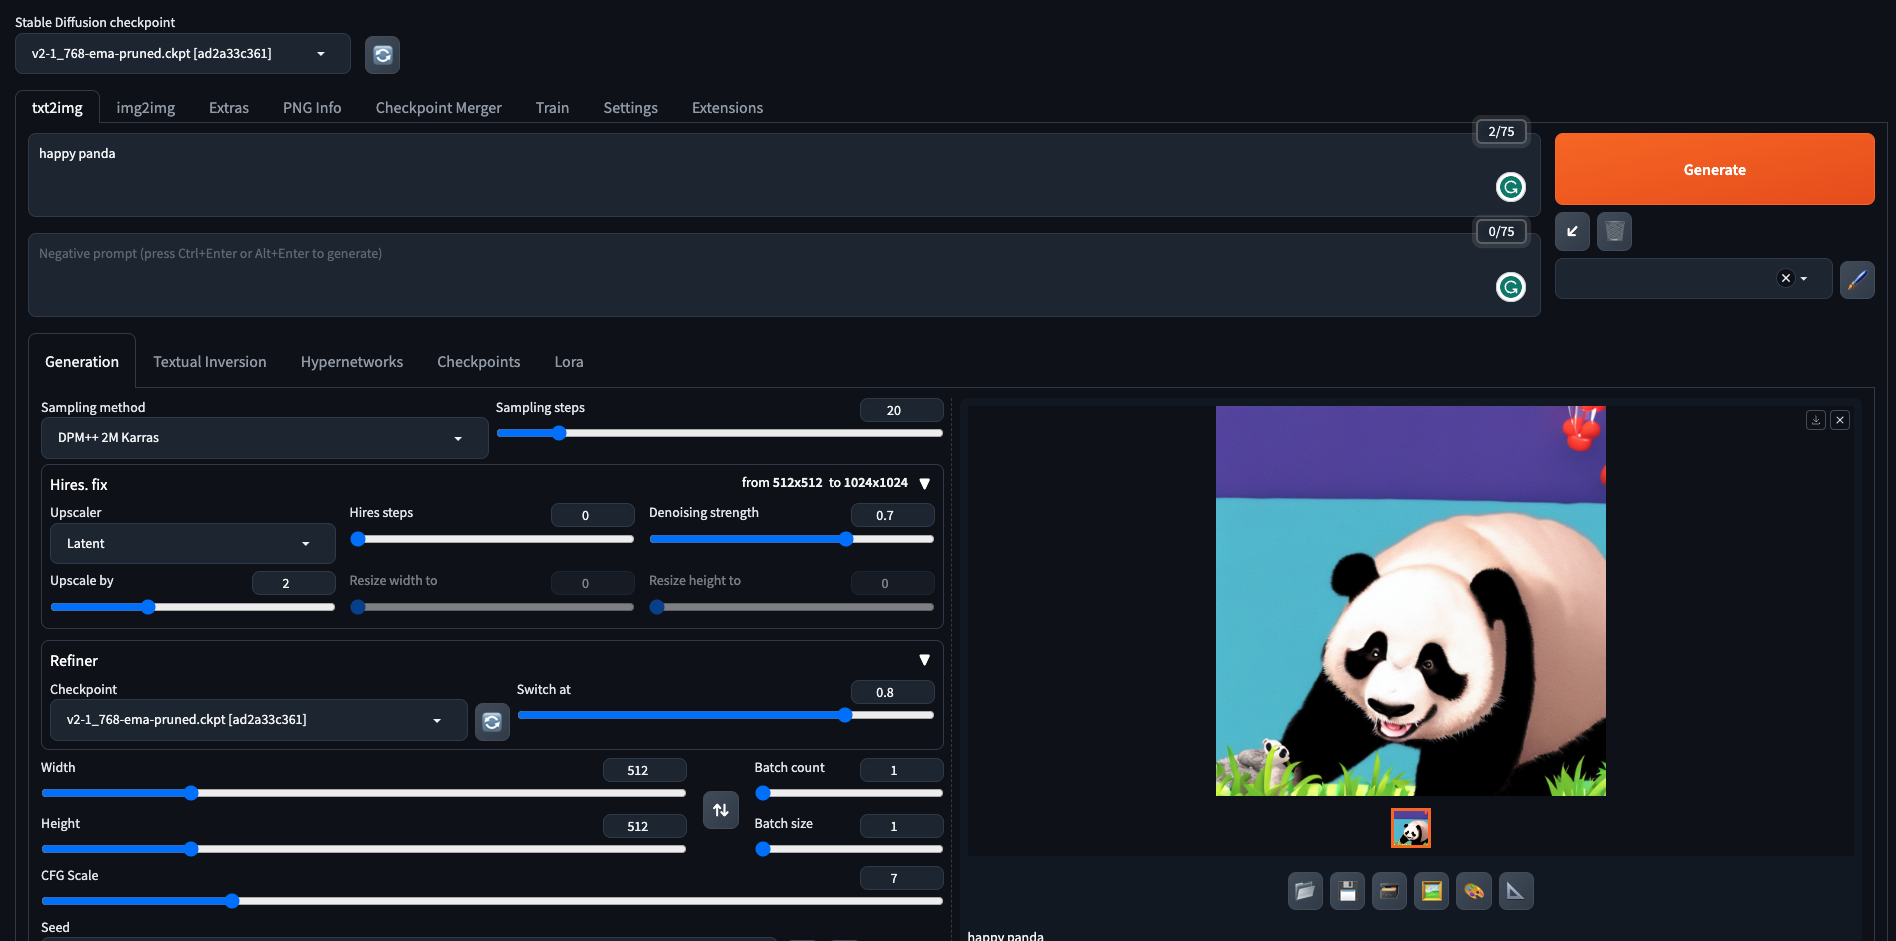
프롬프트 작성
이미지를 생성해보는데 'happy panda' 이런 식으로 써서는 괜찮은 이미지를 얻을 수 없다는 것을 알게되었고
프롬프트를 작성하는 방법이 있다는 것을 알았다.
테스트 해볼 겸 다른 사람들이 이미 작성한 프롬프트를 가져와서 이미지 생성을 해봤다.
이용한 프롬프트
RAW, (intricate details:1.3), (best quality:1.3),
(masterpiece:1.3), (photorealistic:1.4), best quality,
taken by Canon EOS, SIGMA Art Lens 35mm F1.4, ISO 200 Shutter Speed 2000,
Vivid picture, 1girl, ultra-detailed, ultra high resolution,
very detailed physically based rendering, wind, 8K UHD, High definition,
High quality texture, intricate details, detailed texture, finely detailed,
high detail, extremely detailed cg, High quality shadow,
a realistic representation of the face, Dramatic lighting, gritty texture, Dynamic close-up, emphasizing strength,
Mid-punch, showcasing power, Boxing gear, gloves, and shorts, Tied back for practicality, Determined, fierce focus,
Sweat droplets, muscles in action, Boxing gym ambiance, with a punching bag in the frame  k-pop idol girl, korean beauty,
(18-year-old beautiful Korean girl), (full bangs, straight bangs), Capture the image as if it were taken on an instant camera
for added nostalgia beautiful and aesthetic, official art, intricate details, ultra detailed, cinematic lighting, detailed shadow,
beautiful detailed face, colorful, Dynamic angle, (full body shot:1.5), cowboy shot, walking pose.
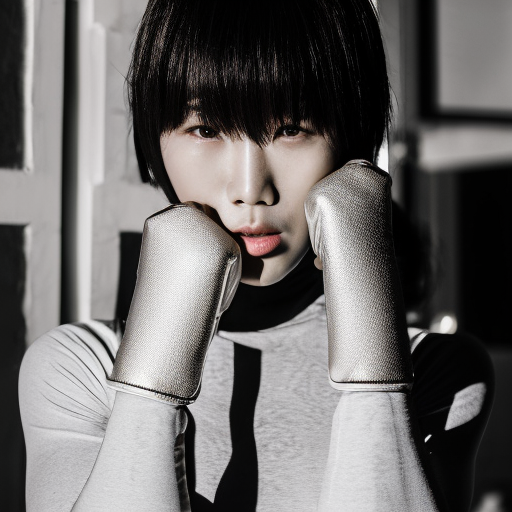
생성 결과
고화질로 생성된 결과를 확인할 수 있었다!
프롬프트 작성시 참고하면 좋을 만한 사이트
[Stable Diffusion] 많이 쓰이는 Prompt 모음 정리
똑똑한누리꾼
똑똑한누리꾼
nulikkun.com
Stable Diffusion prompt: a definitive guide - Stable Diffusion Art
Developing a process to build good prompts is the first step every Stable Diffusion user tackles. This article summarizes the process and techniques developed
stable-diffusion-art.com
Stable Diffusion Prompt Guide for Beginners - AiTuts
When I got started with Stable Diffusion, I was frustrated that my images didn't look anything like the ones I saw on social media. If you feel that way, this guide is for you. It will cover the ins-and-outs of basic prompting. I'll go through things like:
aituts.com
'AI' 카테고리의 다른 글
| MLOps란? (1) | 2024.05.17 |
|---|---|
| Javascript로 AI모델 추론 - Read image as float32 with Javascript (0) | 2024.04.29 |
| Bytes Are All you Need: Transformers Operating Directly On File Bytes 리뷰 (0) | 2023.06.12 |
| AutoEncoder 실습 (0) | 2023.05.18 |
| AE, AutoEncoder (0) | 2023.05.18 |